OUM CID Request System
User Guide & UAT — 3 Perspectives
Overview
As a faculty member, you can submit requests to the Centre of Instructional Design (CID) and track the status of your submissions. Your account is created by the CID administrator — there is no self-registration.
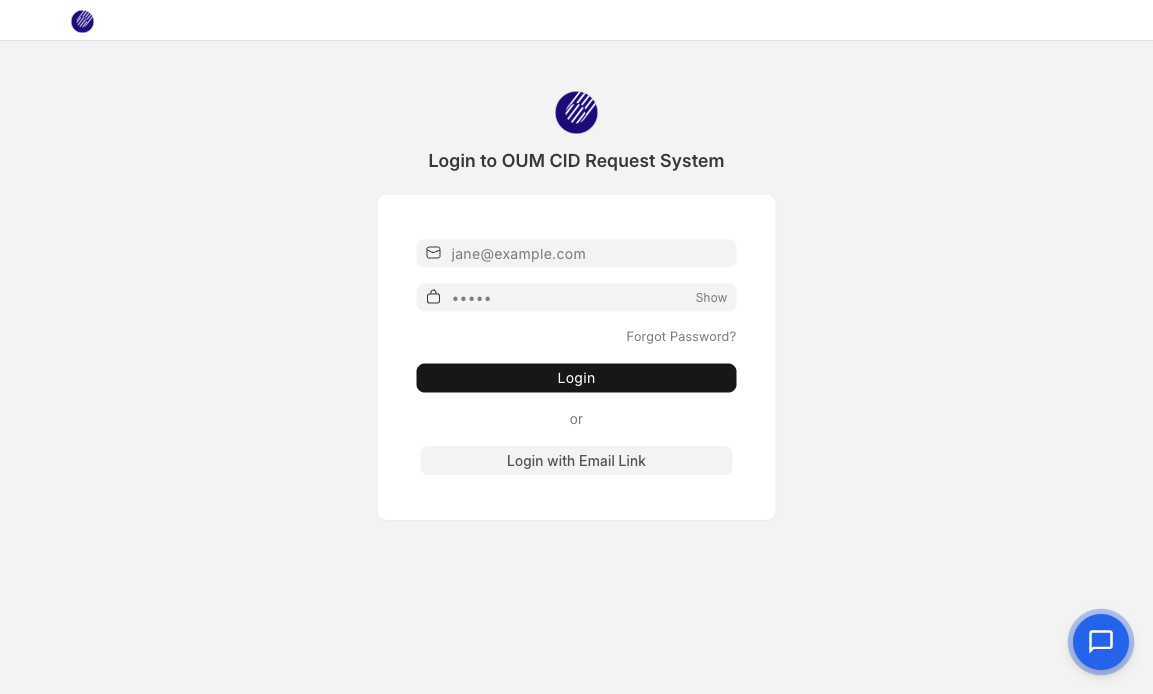
1. How to Login
- Open your browser and go to:
- You will be redirected to the login page.
- Enter your email and password provided by CID admin.
- Click Login.
- After login, you will see the ticket list page.
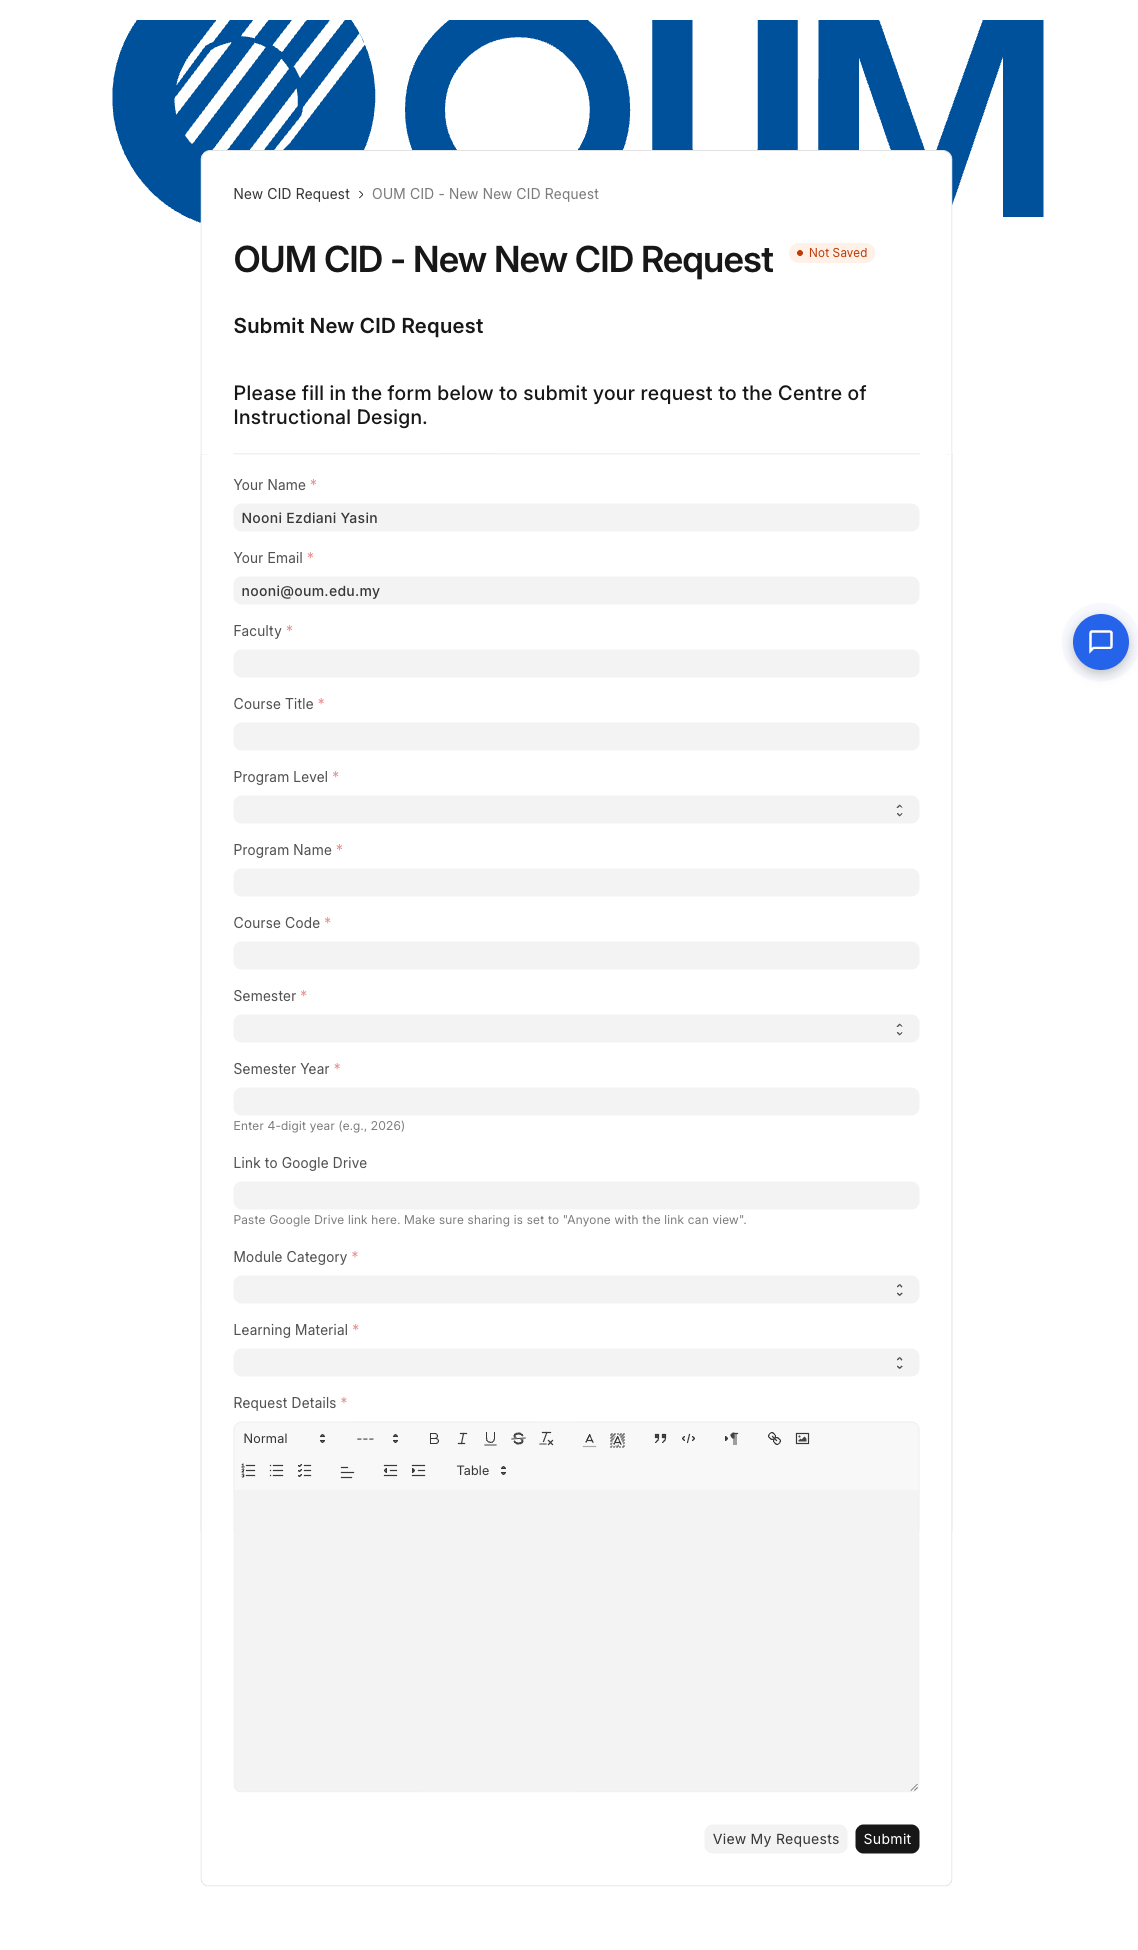
2. Submit a New Request
- From the ticket list page, click the + Add Request button.
- The request form will open. Fill in all required fields:
| Field | Description | Required |
|---|---|---|
| Your Name | Auto-filled from your profile | Yes |
| Your Email | Auto-filled from your profile | Yes |
| Faculty | Auto-filled if linked; otherwise select | Yes |
| Course Title | Title of the course | Yes |
| Program Level | Undergraduate or Postgraduate | Yes |
| Program Name | Name of the program | Yes |
| Course Code | e.g. HMEF5083 | Yes |
| Semester | January, May, or September | Yes |
| Year | 4-digit year, e.g. 2026 | Yes |
| Request Details | Full description of your request | Yes |
| Module Category | Select category | Yes |
| Learning Material | ModuLearn, PiXEL, Flipbook, etc. | Yes |
| Link to Google Drive | Upload files to Google Drive, paste link here. Set sharing to "Anyone with the link can view". | No |
Click Submit. You will see a success message.
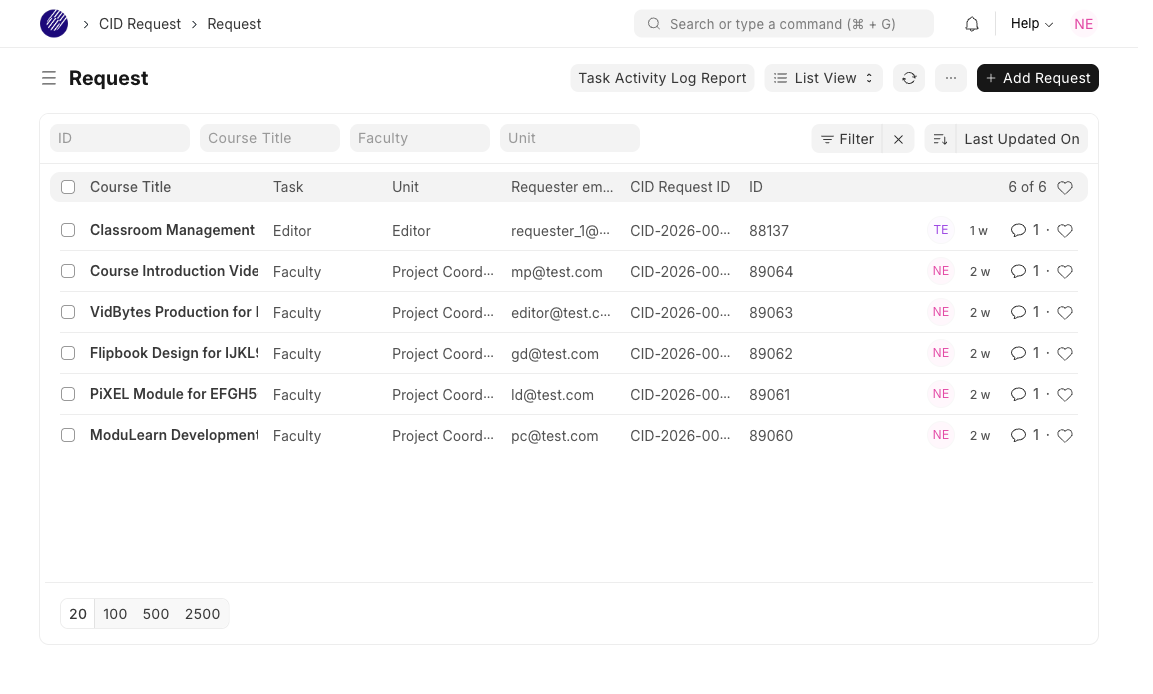
3. View My Requests
- After submitting, click the "View My Requests" button to go back to the ticket list.
- You will see a list of all your submitted requests.
- Click on any request to view its details and current status.
4. What You Can and Cannot Do
| Action | Allowed? |
|---|---|
| Submit new requests | ✅ Yes |
| View your own requests | ✅ Yes |
| Track request status | ✅ Yes |
| Add comments/replies | ✅ Yes |
| Edit request details | ❌ No (read-only after submission) |
| View other people's requests | ❌ No |
| Change task/status | ❌ No |
UAT Checklist — Faculty Member
- Login with faculty account
- Ticket list page loads after login
- Click + Add Request — web form opens with name, email, and faculty auto-filled
- Fill in all required fields and submit
- Success message appears
- "View My Requests" button navigates back to ticket list
- Submitted request appears in the list
- CID Request ID is in format CID-2026-XXXXX
- Can open and view request details
- Cannot edit request fields (read-only)
- Can add a comment/reply on the request
- Cannot see other users' requests
- SLA fields are hidden
- System activity toggle is hidden (only communications visible)
Overview
As Project Coordinator, you are the central hub for all requests. Every new request is automatically assigned to the PC unit. You review, coordinate, and route requests to the appropriate units (LD, Editor, GD, etc.). You can see all tickets across all units.
1. How to Login
- Go to:
- Enter your email and password.
- Click Login.
2. View All Requests
- After login, you will be redirected to the ticket list.
- You will see all tickets from all units (PC is a member of all units).
- Click on any ticket to open it.
3. Review a New Request
When a faculty member submits a request, it is automatically:
- Assigned to Project Coordinator unit
- Task set to Faculty (default initial status)
- PC Team Lead auto-assigned via ToDo
- CID Request ID generated (e.g. CID-2026-00001)
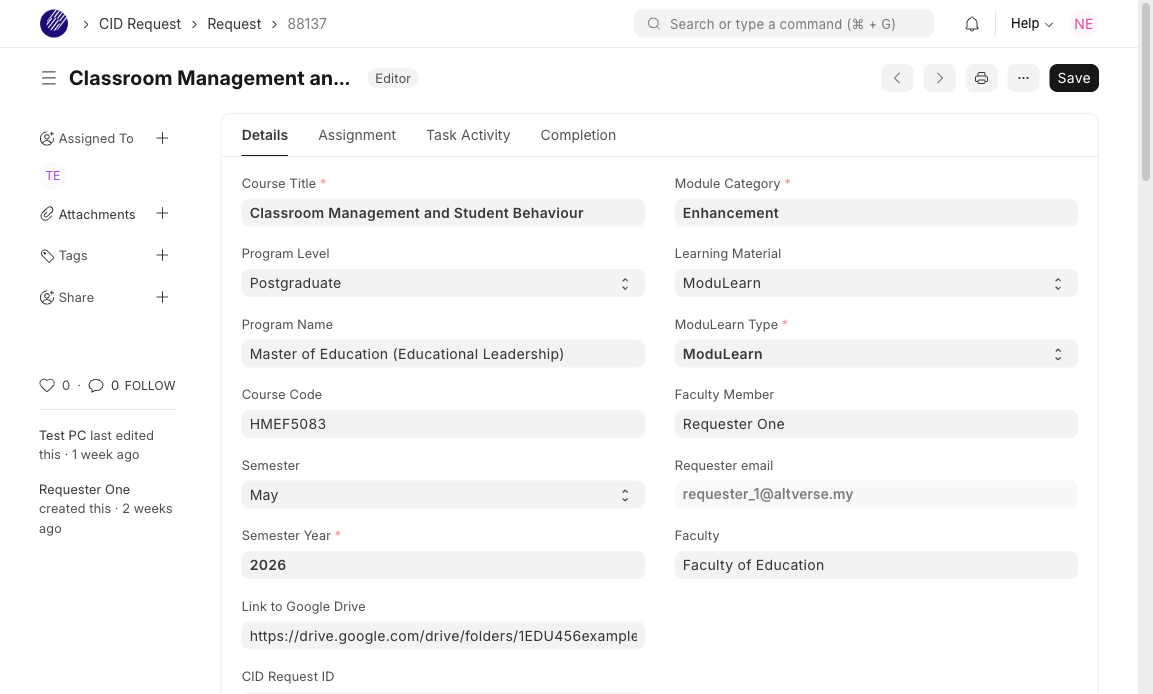
Open the ticket and review the request details, course information, and Google Drive link.
4. Route Request to a Unit
After reviewing, route the request to the appropriate unit:
- Open the ticket.
- Change the Task field to the target stage (e.g. LD, Editor, GD).
- Change the Unit field to the target unit (e.g. Learning Designer).
- Click Save.
5. Assign to a Specific Agent
Optionally, assign the ticket to a specific person within the unit:
- Open the ticket.
- Go to the "Assignment" tab.
- Find the "Assign Agent" dropdown field.
- The dropdown only shows agents from the ticket's current unit (managers are excluded).
- Select the agent and click Save.
6. Task Activity Tab
Each ticket has a "Task Activity" tab showing all 20 task stages with status tracking:
| Status | Meaning | Row Color |
|---|---|---|
| Assigned | Currently active — this unit is working on it | Green |
| Done | Completed — moved to next stage | Grey |
| Not Applicable | Skipped — not needed for this request | Yellow |
| (blank) | Pending — not yet reached | White |
As PC, you can:
- View the full log of all 20 stages
- See who is assigned and when
- Read comments added by agents at each stage
- Set stages to "Not Applicable" if not needed
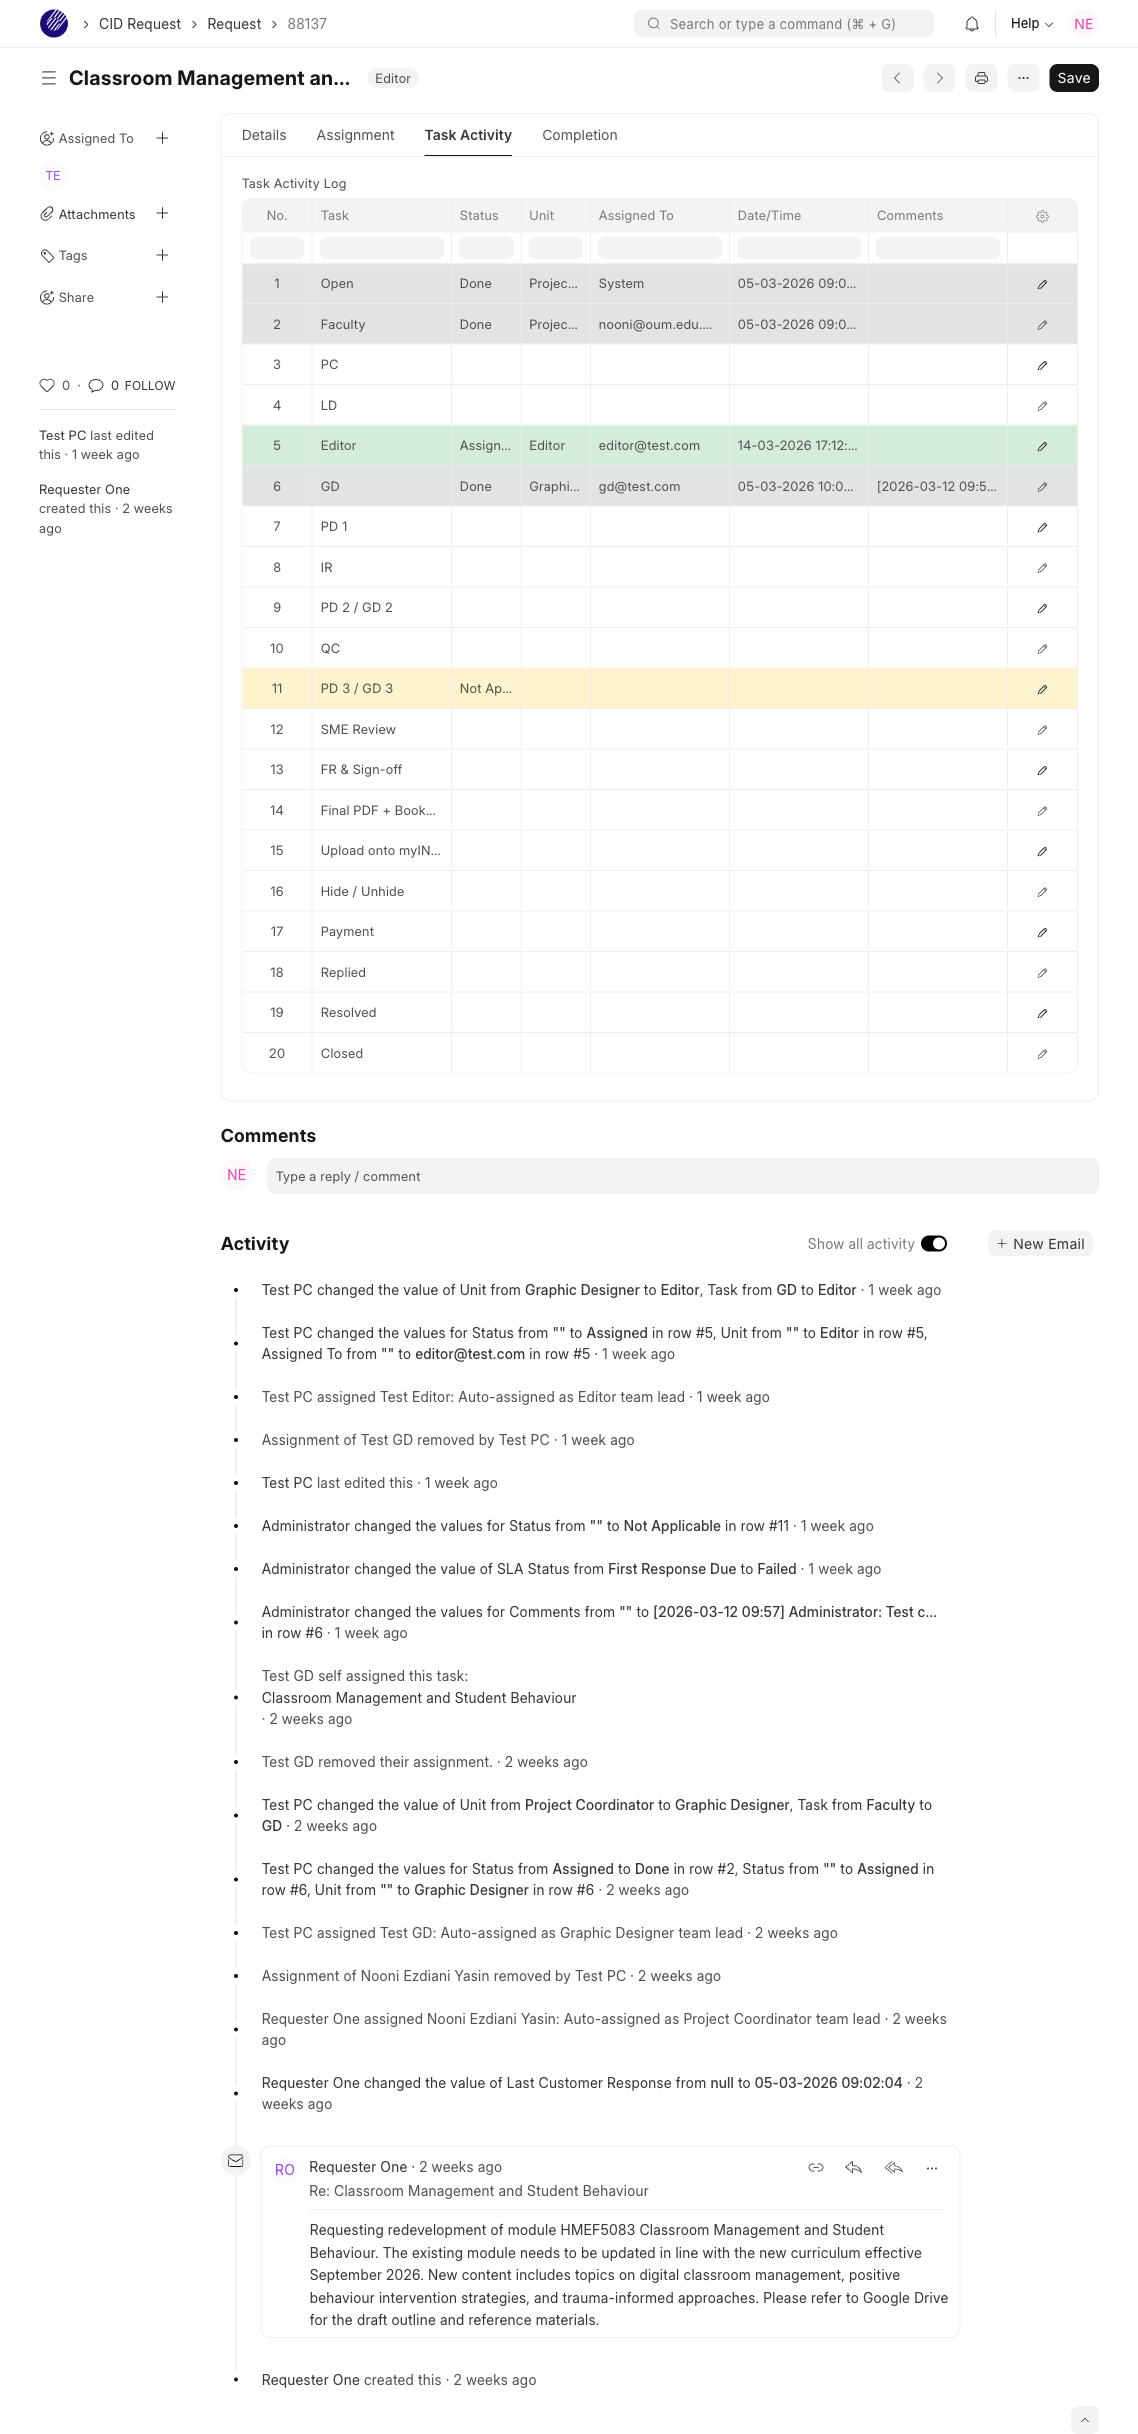
7. Receive Completed Work from Agents
When an agent completes their task, they use the "Assignment Done" feature. This automatically:
- Routes the ticket back to Project Coordinator unit
- Sets Task to PC
- Creates a comment with [Assignment Done] prefix and the agent's notes
- Assigns the PC Team Lead via ToDo
You then review the work and route to the next unit.
8. Add Comments
- Open the ticket.
- Scroll to the bottom (Activity section).
- Type your comment and click Send.
Comments are also synced to the Task Activity tab under the currently assigned task row.
9. Print a Ticket
- Open the ticket.
- Click the menu (⋮) at the top right.
- Select Print.
- Choose format: "HD Ticket with Task Log" for colored task log.
- Print or save as PDF.
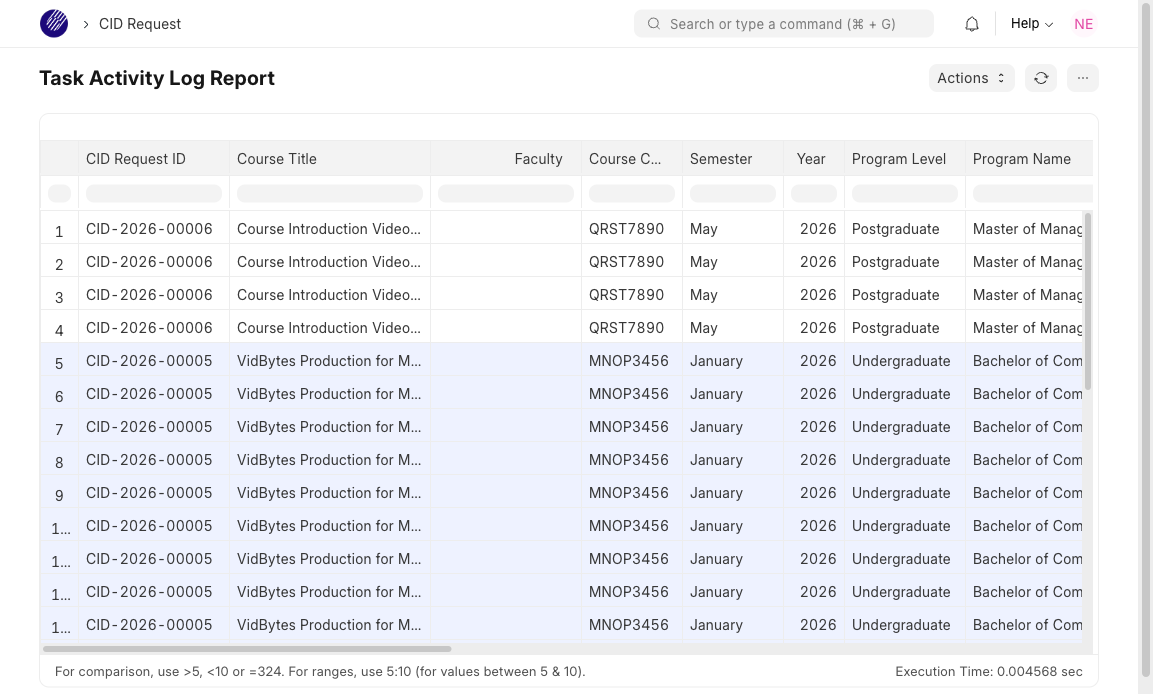
10. Task Activity Log Report
A comprehensive report that lists all task stages across all tickets in a flat, exportable table. Useful for tracking progress, monitoring workload, and generating reports.
- Go to the report URL: Alternatively, from the ticket list page, System Managers can click the "Task Activity Log Report" button in the toolbar.
- The report loads automatically with all data.
- Use the column header filter boxes to narrow down results (e.g. filter Task Stage = "LD", or Faculty = "Faculty of Education").
- Click the CID Request ID or Ticket ID to open that ticket directly.
- To export, click the menu (⋮) → Export to download as Excel or CSV.
What the Report Shows
Each row = one task stage from a ticket's Task Activity Log, joined with ticket metadata. Only rows with status Assigned, Done, or Not Applicable are shown.
| Column | Description |
|---|---|
| CID Request ID | Clickable link to ticket (CID-2026-XXXXX) |
| Course Title | Ticket subject |
| Faculty | Faculty name |
| Course Code / Semester / Year | Course information |
| Program Level / Program Name | Program details |
| Learning Material | ModuLearn, PiXEL, etc. |
| Current Unit | Current unit assignment |
| # / Task Stage / Task Status | Task row index, stage name, and status (Assigned/Done/Not Applicable) |
| Task Unit / Assigned To | Unit and person at time of assignment |
| Date/Time | When the task was assigned |
| Comments | Timestamped comments from agents |
| Ticket Created / Ticket ID | Creation date and system ticket ID (clickable) |
Alternate Row Coloring
Rows belonging to the same ticket share the same background color, alternating between white and light blue for each ticket group. This makes it easy to visually distinguish which rows belong to which ticket.
Access
| Role | Can View Report | Report Button on Ticket List |
|---|---|---|
| System Manager | ✅ Yes | ✅ Yes |
| Agent Manager | ✅ Yes | ❌ No |
| Agent | ✅ Yes | ❌ No |
UAT Checklist — Project Coordinator
- Login with PC account
- Can see all tickets from all units
- New request appears with Task = Faculty, Unit = Project Coordinator
- CID Request ID generated correctly
- PC Team Lead auto-assigned on new ticket
- Change Task (e.g. Faculty → LD) — Task Activity tab updates correctly
- Change Unit (e.g. PC → Learning Designer) — Team Lead auto-assigned
- Assign specific agent via "Assign Agent" dropdown — only unit members shown
- Task Activity tab shows 20 rows with correct statuses and colors
- Can set task stage to "Not Applicable"
- Comments sync to Task Activity tab
- Receive ticket back from agent via Assignment Done
- [Assignment Done] comment visible in Activity and Task Activity tab
- Can print ticket with "HD Ticket with Task Log" format
- Can send email to requester via "New Email" button
- Task Activity Log Report loads at report URL
- Report shows alternate row colors per ticket group (white / light blue)
- CID Request ID and Ticket ID columns are clickable
- Column filters work (e.g. filter by Task Stage or Faculty)
- Can export report to Excel/CSV
Overview
As an agent (LD, Editor, GD, PD, Multimedia Programmer, Video Editor, Animator), you handle requests assigned to your unit. You can only see tickets assigned to your unit. When you complete your task, use the "Assignment Done" feature to route the ticket back to PC.
1. How to Login
- Go to:
- Enter your email and password.
- Click Login.
| Unit | Password | |
|---|---|---|
| Learning Designer | fadzylah@oum.edu.my | Test@1234 |
| Publication Designer | syaliza@oum.edu.my | Test@1234 |
| Editor | editor@test.com | Test@1234 |
| Graphic Designer | gd@test.com | Test@1234 |
| Multimedia Programmer | mp@test.com | Test@1234 |
| Video Editor | ve@test.com | Test@1234 |
| Animator | animator@test.com | Test@1234 |
2. View Your Unit's Requests
- After login, you will be redirected to the ticket list.
- You will see only tickets assigned to your unit.
- Click on a ticket to open it.
3. Work on a Request
- Open the ticket assigned to your unit.
- Review the request details, course info, and Google Drive link.
- Do your work (design, edit, review, etc.).
- Add comments in the Activity section to document progress.
4. Assign to a Team Member (Team Leads)
If you are a Team Lead, you can assign the ticket to a specific agent in your unit:
- Open the ticket.
- Go to the "Assignment" tab.
- Find the "Assign Agent" dropdown — it only shows agents from your unit.
- Select the agent and click Save.
5. Complete Your Task — Assignment Done
When you have finished your work:
- Open the ticket.
- Click the "Assignment Done" tab.
- Write your completion notes in the "Task Completion Notes" field.
Example: "Content development completed for all 10 topics. Ready for editorial review." - Click Save.
- Green alert: "Assignment completed. Routing back to Project Coordinator..."
- You are automatically redirected to the ticket list
- The ticket is now with PC unit (you can no longer see it)
- A comment with [Assignment Done] prefix is created
- Task Activity tab: your task = Done, PC = Assigned

6. Task Activity Tab
You can view the "Task Activity" tab to see the full history of the ticket's journey through all units. You can add comments in the Comments column for your assigned task row.
7. What You Can and Cannot Do
| Action | Allowed? |
|---|---|
| View tickets in your unit | ✅ Yes |
| Add comments on tickets | ✅ Yes |
| Assign agent via "Assign Agent" dropdown (Team Leads) | ✅ Yes |
| Use Assignment Done to route back to PC | ✅ Yes |
| View Task Activity tab | ✅ Yes |
| Add comments in Task Activity tab | ✅ Yes |
| View tickets from other units | ❌ No |
| Change Task or Unit | ❌ No (PC/managers only) |
| Change Task Activity status | ❌ No (PC/managers only) |
| Access system settings | ❌ No |
UAT Checklist — Agent
- Login with agent account
- Can only see tickets assigned to own unit
- Cannot see tickets from other units
- Can open and view ticket details
- Can add comments in Activity section
- Comments sync to Task Activity tab
- "Assignment" tab visible with "Assign Agent" dropdown
- Assign Agent dropdown shows only unit members (no managers)
- Select agent and save — agent appears in sidebar Assigned To
- "Assignment Done" tab is visible
- Fill completion notes and save
- Green alert appears and auto-redirect to ticket list
- Ticket no longer visible (now with PC unit)
- [Assignment Done] comment created with notes
- Task Activity tab: own task = Done, PC = Assigned
- Task and Unit fields are read-only (only System Manager can edit)
- Cannot change Task Activity status column
- Cannot access system settings or configuration
Overview
All accounts use the same default password: Test@1234
Login at: https://oumcidrequest.tetupai.com
Real CID Staff Accounts
| No | Name | Role | Unit(s) | Team Lead Of | |
|---|---|---|---|---|---|
| 1 | Puan Shawira binti Abu Bakar | shawira@oum.edu.my | System Manager | PC | — |
| 2 | Encik Zulhairi bin Salih | zulhairi@oum.edu.my | System Manager | PC, Multimedia Programmer, Video Editor | Multimedia Programmer, Video Editor |
| 3 | Dr Nooni Ezdiani binti Yasin | nooni@oum.edu.my | System Manager | Editor, LD, PC | PC |
| 4 | Puan Nor Fadzilah binti Ishak | fadzylah@oum.edu.my | Agent | LD | LD |
| 5 | Cik Syaliza binti Mat Zain | syaliza@oum.edu.my | Agent | PD | PD |
Test Accounts
| Unit | Role | Team Lead? | |
|---|---|---|---|
| Project Coordinator | pc@test.com | Agent | No |
| Learning Designer | ld@test.com | Agent | No |
| Graphic Designer | gd@test.com | Agent | Yes (GD) |
| Publication Designer | pd@test.com | Agent | No |
| Editor | editor@test.com | Agent | Yes (Editor) |
| Multimedia Programmer | mp@test.com | Agent | No |
| Video Editor | ve@test.com | Agent | No |
| Animator | animator@test.com | Agent | Yes (Animator) |
Role Hierarchy
| Role | Access Level | Who |
|---|---|---|
| System Manager | Full admin — all settings, scripts, permissions | Shawira, Zulhairi, Nooni |
| Agent Manager | View all tickets across all units | System Managers (auto-included) |
| Agent | View tickets in own unit only | All staff (real + test) |
| Helpdesk Contact | Faculty — submit and view own tickets only | Faculty members |
Team Lead Assignments
| Unit | Team Lead | |
|---|---|---|
| Project Coordinator | Dr Nooni Ezdiani binti Yasin | nooni@oum.edu.my |
| Learning Designer | Puan Nor Fadzilah binti Ishak | fadzylah@oum.edu.my |
| Publication Designer | Cik Syaliza binti Mat Zain | syaliza@oum.edu.my |
| Multimedia Programmer | Encik Zulhairi bin Salih | zulhairi@oum.edu.my |
| Video Editor | Encik Zulhairi bin Salih | zulhairi@oum.edu.my |
| Graphic Designer | (test account) | gd@test.com |
| Editor | (test account) | editor@test.com |
| Animator | (test account) | animator@test.com |
Typical Workflow
| # | Step | Who | Action |
|---|---|---|---|
| 1 | Submit Request | Faculty | Fills web form and submits |
| 2 | Auto-Assign | System | Ticket assigned to PC unit, PC Team Lead assigned |
| 3 | Review & Route | PC | Reviews request, changes Task & Unit to target (e.g. LD) |
| 4 | Work on Request | Agent (LD) | Completes work, adds comments |
| 5 | Assignment Done | Agent (LD) | Writes completion notes, saves → auto-routes to PC |
| 6 | Review & Route Next | PC | Reviews LD work, routes to Editor |
| 7 | ... | ... | Cycle repeats through all required units |
| 8 | Resolve | PC | Sets Task to Resolved/Closed when all work complete |
Troubleshooting
| Problem | Solution |
|---|---|
| Cannot login | Check email and password. Clear browser cache. Try a different browser. |
| Cannot see any tickets | Check that your user is a member of the correct unit (HD Team). |
| "Not Permitted" error | You may be trying to access a ticket from another unit. Go back to the ticket list. |
| "Read-Only Access" error (Faculty) | Faculty cannot edit tickets. Close the dialog — page will auto-refresh. |
| Assignment rejected | You can only assign agents who are members of the ticket's current unit. |
| Web form fields not loading | Clear browser cache and reload. If dropdowns are empty, contact admin. |
URLs Summary
| Purpose | URL |
|---|---|
| Login (All Users) | https://oumcidrequest.tetupai.com |
| Ticket List (after login) | https://oumcidrequest.tetupai.com/app/hd-ticket |